返回首页
9.高级调度计划任务临时容器
1.Job和CronJob 1.1.Job与CronJob概念与与原理解读 0:完成状态、非0:错误状态;以非0状态码退出就会重启pod 1.2. Job三种使用场景 1.3. 适用场景 Job可以干什么 1.4.Job控制器 资源清单编写技巧 创建一个一次性任务 创建一个一次性任务2 backof
1.Job和CronJob 1.1.Job与CronJob概念与与原理解读 0:完成状态、非0:错误状态;以非0状态码退出就会重启pod 1.2. Job三种使用场景 1.3. 适用场景 Job可以干什么 1.4.Job控制器 资源清单编写技巧 创建一个一次性任务 创建一个一次性任务2 backof
Job 控制器用于管理 Pod 对象运行一次性任务,比方说我们对数据库备份,可以直接在 k8s 上启动一个 mysqldump 备份程序,也可以启动一个 pod,这个 pod 专门用来备份用的,备份结束 pod 就可以终止了,不需要重启,而是将 Pod 对象置于"Completed"(完成)状态,
若容器中的进程因错误而终止,则需要按照重启策略配置确定是否重启,对于 Job 这个类型的控制器来说,需不需要重建 pod 就看任务是否完成,完成就不需要重建,没有完成就需要重建 pod。 Job 控制器的 Pod 对象的状态转换如下图所示: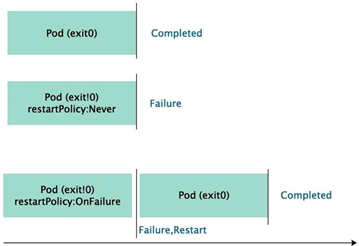
0:完成状态、非0:错误状态;以非0状态码退出就会重启pod
1、非并行任务:只启一个 pod,pod 成功,job 正常结束
2、并行任务同时指定成功个数:.spec.completions 为指定成功个数,可以指定也可以不指定.spec.parallelism(指定>1,会有多个任务并行运行)。当成功个数达到.spec.completions,任务结束。
3、有工作队列的并行任务:.spec.completions 默认1,.spec.parallelism 为大于 0 的整数。此时并行启动多个 pod,只要有一个成功,任务结束,所有 pod 结束Job可以干什么
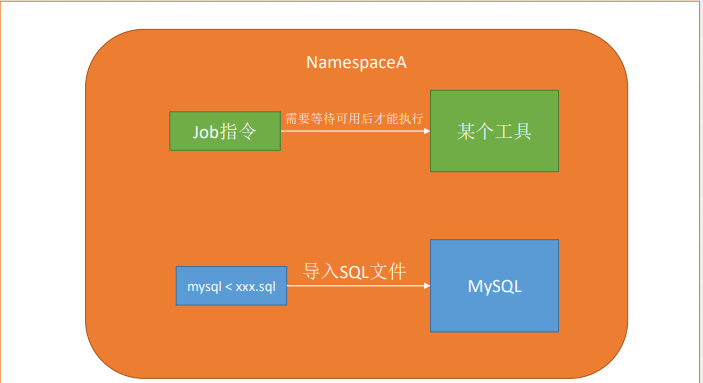
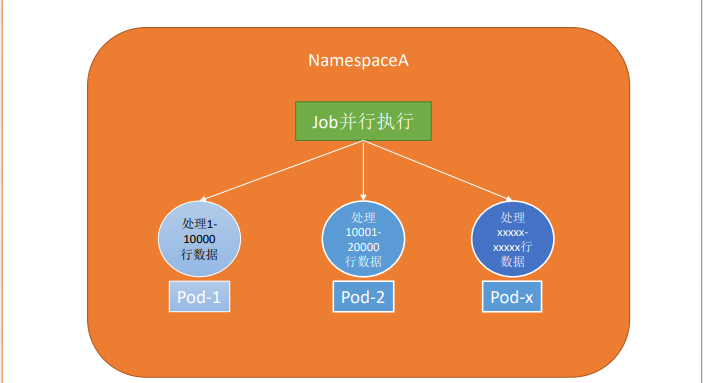
创建一个一次性任务
创建一个一次性任务2
backoffLimit: 如果任务执行失败,失败多少次后不再执行
completions:有多少个Pod执行成功,认为任务是成功的
为空默认和parallelism数值一样
如果parallelism数值大于未完成任务数,只会创建未完成的数量; 比如completions是4,并发是3,第一次会创建3个Pod执行任务, 第二次只会创建一个Pod执行任务
ttlSecondsAfterFinished:Job在执行结束之后(状态为completed或 Failed)自动清理。设置为0表示执行结束立即删除,不设置则不会 清除,需要开启TTLAfterFinished特性
suspend: 指定作业是否被挂起。当设置为true时,作业将被挂起,不会被调度执行。默认情况下,该字段未设置,即作业不会被挂起。
注意:
Job的RestartPolicy仅支持Never和OnFailure两种,不支持Always, Job就相当于来执行一个批处理任务,执行完就结束了,如果支持Always的话会陷入了死循环了。 Nerver 只要任务没有完成,就会删除pod并新创建pod运行,直到job完成【会产生多个pod】 OnFailure 只要pod没有完成,则会重启pod,直到job完成
kubernetes CronJob和Linux crontab对比
CronJob表达式语法
生成cronjob的yaml文件,--schedule="*/1 * * * *" 表示每分钟执行一次,执行的命令为:-- sh -c "date;sleep 10"打印当前日期和休眠10秒钟。
修改yaml文件,功能为:创建一个 名为my-cronjob的Kubernetes CronJob定时任务,使用 busybox 镜像作为容器镜像,执行每分钟一次的定时任务,任务是date;sleep 10打印当前日期和休眠10秒钟。
schedule:*/1 * * * *:表示每分钟执行一次作业。
restartPolicy: OnFailure:在容器执行失败时重新启动容器。
创建cronjob并查看
现在开始观察pod状态,使用watch每 0.5 秒执行一次 kubectl get pod 命令,实时查看 Kubernetes 集群中 Pod 的状态信息。可以发现由于sleep 10,所以每个pod运行10秒之后status由running变为Completed。
删除cronjob
root@k8s-master01:~/hhh# kubectl delete cj my-cronjob
cronjob.batch "my-cronjob" deleted
创建具有超时时间的CronJob定时任务
刚才创建的cronjob,每个pod会运行10s(sleep 10),有的pod可能会运行很长时间,我们可以使用activeDeadlineSeconds参数限制pod最多运行多长时间。activeDeadlineSeconds 用于指定 Pod 最大的运行时间。如果一个 Pod 已经运行了超过这个时间,Kubernetes 会强制将其终止删除。修改yaml文件,添加activeDeadlineSeconds: 5:设置了 Pod 最大运行时间为 5 秒,如果超过这个时间就会被 Kubernetes 强制删除。
创建cronjob
现在开始观察pod状态,使用watch每 0.5 秒执行一次 kubectl get pod 命令,实时查看 Kubernetes 集群中 Pod 的状态信息。可以发现每一分钟执行一次定时任务“*/1 * * * *” ,sleep 10超过5秒,pod运行5秒之后被强制删除。
示例3:
apiVersion: batch/v1beta1 #1.21+ batch/v1
schedule:调度周期,和Linux一致,分别是分时日月周。
restartPolicy:重启策略,和Pod一致。
concurrencyPolicy:并发调度策略。可选参数如下:
suspend:如果设置为true,则暂停后续的任务,默认为false。
successfulJobsHistoryLimit:保留多少已完成的任务,按需配置。
failedJobsHistoryLimit:保留多少失败的任务
用于初始化工作,执行完就结束,不是持续运行的,可以理解为一次性任务。
在主应用启动之前,做一些初始化的操作,比如创建文件、修改内核参数、等待 依赖程序启动或其他需要在主程序启动之前需要做的工
PostStart:依赖主应用的环境,而且并不一定先于Command运行
InitContainer:不依赖主应用的环境,可以有更高的权限和更多的工具,一定会在主应用启动之前完成
Init 容器与普通的容器非常像,除了如下几点:
它们总是运行到完成;
上一个运行完成才会运行下一个;
如果 Pod 的 Init 容器失败,Kubernetes 会不断地 重启该 Pod,直到 Init 容器成功为止,但是Pod 对应的 restartPolicy 值为 Never,Kubernetes 不会 重新启动 Pod。
Init 容器不支持 lifecycle、livenessProbe、 readinessProbe 和 startupProbe
示例:部署一个web网站,网站程序没有打到镜像中,而是希望从代码仓库中动态拉取放到应用容器中
创建
root@k8s-master01:~/hhh# kubectl create -f init.yaml
pod/pod7 created
运行此yaml并kubectl get pod [-n 命名空间] -w 实时查看pod状态
使用 kubectl logs -f pod名 -c 初始化的容器名 [-n 命名空间] 来查看初始化容器的日志
pod启动后,可以curl一下pod的index.html,我这里代码的index.html是在nginx/html/dist目录下,所以在访问的时候应该是url/dist/index.html
示例2:
创建
Pod中会有这几种类型的容器:
Infrastructure Container:基础容器 用途:负责维护整个Pod网络空间;
InitContainers:初始化容器 用途:先于业务容器开始执行(主要做一些业务容器的初始化工作,例如启动主容器之前的一些前置、依赖工作),再执行业务容器;
Containers:业务容器 用途:并行启动,无论container下有多少个容器,都是并行启动的,例 边车容器也是在Container下定义的,它属于container的一种工作模式,并不是一个独立类型的容器.
示例3:
这个示例配置文件创建了一个 Deployment,其中的初始化容器(init-touch)会在 Pod 启动之前执行命令 "touch /mnt/test-init.txt",在容器内创建一个名为 "test-init.txt" 的文件。主容器(test-init)则会挂载同一个卷,并可以访问初始化容器创建的文件。
生产环境下为了优化镜像体积和提高镜像的安全性,并不会在容器中安装太多高危工具,比如curl、wget、dig以及常用的net-tools等。这样做虽然提高了镜像的安全性,但也带来了一些不便,比如无法查看容器内的进程情况、无法查看容器内的链接情况、服务出了问题无法很方便地进行排查等。因为上述操作并非经常使用,所以我们并没有必要从一开始就安装这些工具,但是等用到的时候再安装也是一件很麻烦的事情,为了解决这类问题,在1.16版本后,Kubernetes引入了Ephemeral Containers的概念,可以不用安装第三方工具即可实现在线Debug操作。
从镜像角度探讨容器安全
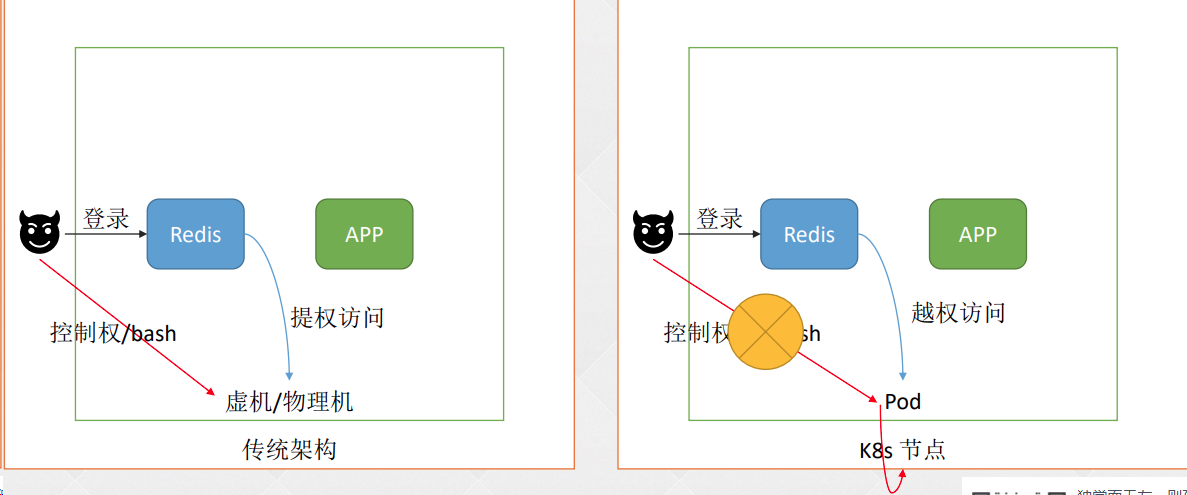
临时容器
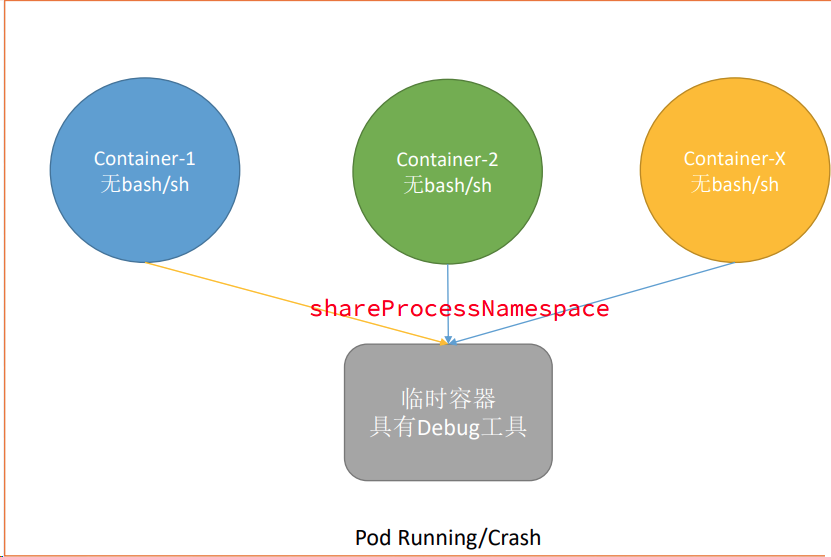
临时容器与其他容器的不同之处在于,它们缺少对资源或执行的保证,并且永远不会自动重启, 因此不适用于构建应用程序。 临时容器使用与常规容器相同的 ContainerSpec 节来描述,但许多字段是不兼容和不允许的。
ports、livenessProbe、readinessProbe 这样的字段是不允许的。resources 配置是不允许的。临时容器是使用 API 中的一种特殊的 ephemeralcontainers 处理器进行创建的, 而不是直接添加到 pod.spec 段,因此无法使用 kubectl edit 来添加一个临时容器。
注意:临时容器不被静态Pod支持
临时容器是为了调试程序而设计的,所以在添加临时容器时,最好使用一个包含所有常用工具的镜像进行创建。当业务容器崩溃或容器镜像不包含调试工具而导致kubectl exec不可用时,临时容器对于交互式故障排查和在线Debug很有用。尤其是在使用像不包含任何shell和其他工具的distroless镜像作为基础镜像时,虽然可以减少攻击面和漏洞,但是对于问题的排查会变得尤为棘手,此时临时容器就可以发挥很大的作用,带来诸多便利性。
主要介绍kubeadm安装方式和二进制方式如何使用临时容器在线debug,这里需要注意版本1.25+不需要开启临时容器功能:
1.所有master节点编辑/etc/kubernetes/manifests/kube-apiserver.yaml,添加- --feature-gates=EphemeralContainers=true
2.所有master节点编辑/etc/kubernetes/manifests/kube-controller-manager.yaml,添加- --feature-gates=EphemeralContainers=true
3.所有master节点编辑/etc/kubernetes/manifests/kube-scheduler.yaml ,添加- --feature-gates=EphemeralContainers=true
4.所有master节点和node节点编辑/var/lib/kubelet/kubeadm-flags.env文件,添加--feature-gates=EphemeralContainers=true
# vim /var/lib/kubelet/kubeadm-flags.env

KUBELET_KUBEADM_ARGS="--container-runtime=remote --container-runtime-endpoint=/run/containerd/containerd.sock --pod-infra-container-image=registry.cn-hangzhou.aliyuncs.com/google_containers/pause:3.6 --feature-gates=EphemeralContainers=true"
5.所有master节点和node节点重新加载daemon文件并重启kubelet
# systemctl daemon-reload
# systemctl restart kubelet
6.完成后,重新查看node节点状态
7.查找一个pod做测试用,这里选择metrics-server-5cf8885b66-99jwg作为测试Pod
8.使用临时容器
9.如果终端卡死可以另起一个窗口使用kubectl exec进入到临时容器
1.所有master节点编辑/usr/lib/systemd/system/kube-apiserver.service文件,添加--feature-gates=EphemeralContainers=true
# vim /usr/lib/systemd/system/kube-apiserver.service2.所有master节点编辑/usr/lib/systemd/system/kube-controller-manager.service文件,添加--feature-gates=EphemeralContainers=true
# vim /usr/lib/systemd/system/kube-controller-manager.service3.所有master节点编辑/usr/lib/systemd/system/kube-scheduler.service文件,添加--feature-gates=EphemeralContainers=true
# vim /usr/lib/systemd/system/kube-scheduler.service4.所有master节点和node节点编辑/usr/lib/systemd/system/kube-proxy.service文件,添加--feature-gates=EphemeralContainers=true
# vim /usr/lib/systemd/system/kube-proxy.service5.所有master节点和node节点编辑/etc/kubernetes/kubelet-conf.yml文件,添加以下参数
6.所有master节点和node节点重启所有服务
# systemctl daemon-reload
# systemctl restart kubelet kube-apiserver kube-controller-manager kube-scheduler kube-proxy
7.在master01节点上查找一个pod做测试用,这里选择metrics-server-5cf8885b66-99jwg作为测试Pod
8.在master01节点上使用临时容器
9.在master01节点上如果终端卡死可以另起一个窗口使用kubectl exec进入到临时容器
临时容器功能在Kubernetes 1.16后的版本才可以使用,并且在1.16~1.18版本和1.18+版本的使用方法不太一致。
临时容器是使用Pod的ephemeralcontainers子资源创建的,可以使用kubectl --raw向一个正在运行的Pod注入一个临时容器,假如向kube-system命名空间下的metrics-server容器添加一个busybox的临时容器。
首先查看metrics-server的Pod名称
接着创建一个ec.json文件,声明临时容器的配置,内容如下:
需要注意的地方:
之后使用kubectl replace --raw命令更新已运行的临时容器metrics-server-6bf7dcd649-v7gqt
# kubectl replace --raw /api/v1/namespace/kube-system/pods/ metrics-server-89786cd84-t9dwm/ephemeralcontainers -f ec.json执行成功后将返回临时容器的新列表(部分代码)
添加成功后,可以使用describe命令查看新创建的临时容器的状态
# kubectl describe po metrics-server-89786cd84-t9dwm -n kube-system然后就可以使用以下exec或者attach命令连接新的临时容器(-c指定为临时容器的名称)
# kubectl attach -it metrics-server-89786cd84-t9dwm -n kube-system -c debuggerKubernetes版本低于1.18时,使用临时容器在线Debug的过程还是比较麻烦的,在1.18版本之后(包括1.18),使用临时容器在线Debug就相对简单了,可以直接使用kubectl alpha debug进行调试,比如上述操作可以用一条命令代替:
# kubectl alpha debug metrics-server-89786cd84-t9dwm -n kube-system -i --image=busybox注意:1.18版本也需要开启临时容器功能。1.19以上版本kubectl命令不用再加alpha字段!!!
在1.19版本之后,kubectl命令不用再加alpha字段。此时添加临时容器一般有两种:
第一种给Pod添加临时容器:
# kubectl debug redis-new-5b577b46c7-2jv4j -ti --image=registry.cn-hangzhou.aliyuncs.com/zq-demo/debug-tools第二种给节点添加临时容器:
# kubectl debug node/k8s-node01 -it --image=registry.cn-hangzhou.aliyuncs.com/zq-demo/debug-tools使用临时容器来调试的例子:
你可以使用 kubectl debug 命令来给正在运行中的 Pod 增加一个临时容器。 首先,像示例一样创建一个 pod:
root@k8s-master01:/usr/local/bin# kubectl run ephemeral-demo --image=harbor.nbbnai.com/easzlab/pause:3.9 --restart=Never
本节示例中使用 pause 容器镜像,因为它不包含调试程序,但是这个方法适用于所有容器镜像。
使用 kubectl exec 来创建一个 shell,你将会看到一个错误,因为这个容器镜像中没有 shell。
使用 kubectl debug 添加调试容器。 如果你指定 -i 或者 --interactive 参数,kubectl 将自动挂接到临时容器的控制台。
此命令添加一个新的 busybox 容器并将其挂接到该容器。--target 参数指定另一个容器的进程命名空间。 这个指定进程命名空间的操作是必需的,因为 kubectl run 不能在它创建的 Pod 中启用共享进程命名空间。
使用 kubectl describe 查看新创建的临时容器的状态
一般临时容器不会自动删除,需要手动重新启动Pod或者删除Pod。
Job 不是设计用来完成通信密集型的并行程序,如科学计算领域常见的场景。它支持并行地处理一组独立但相关的 work item,如发送邮件,渲染帧,转码文件和扫描 NoSql 数据库中的 key

kubectl explain Job.spec
相关配置:
.spec.completions:完成该 Job 需要执行成功的 Pod 数
.spec.parallelism:能够同时运行的 Pod 数
.spec.backoffLimit:允许执行失败的 Pod 数,默认值是 6,0 表示不允许 Pod 执行失败。如果Pod 是 restartPolicy 为 Nerver,则失败后会创建新的 Pod,如果是 OnFailed,则会重启 Pod,不管是哪种情况,只要 Pod 失败一次就计算一次,                    而不是等整个 Pod 失败后再计算一个。当失败的次数达到该限制时,整个 Job 随即结束,所有正在运行中的 Pod 都会被删除。
.spec.activeDeadlineSeconds: Job 的超时时间,一旦一个 Job 运行的时间超出该限制,则 Job失败,所有运行中的 Pod 会被结束并删除。该配置指定的值必须是个正整数。不指定则不会超时
root@k8s-master01:~# kubectl explain Job
GROUP: batch
KIND: Job
VERSION: v1
DESCRIPTION:
Job represents the configuration of a single job.
FIELDS:
apiVersion <string>
APIVersion defines the versioned schema of this representation of an object.
Servers should convert recognized schemas to the latest internal value, and
may reject unrecognized values. More info:
https://git.k8s.io/community/contributors/devel/sig-architecture/api-conventions.md#resources
kind <string>
Kind is a string value representing the REST resource this object
represents. Servers may infer this from the endpoint the client submits
requests to. Cannot be updated. In CamelCase. More info:
https://git.k8s.io/community/contributors/devel/sig-architecture/api-conventions.md#types-kinds
metadata <ObjectMeta> #元数据,定义资源的名字和所在名称空间
Standard object's metadata. More info:
https://git.k8s.io/community/contributors/devel/sig-architecture/api-conventions.md#metadata
spec <JobSpec>
Specification of the desired behavior of a job. More info:
https://git.k8s.io/community/contributors/devel/sig-architecture/api-conventions.md#spec-and-status
status <JobStatus>
Current status of a job. More info:
https://git.k8s.io/community/contributors/devel/sig-architecture/api-conventions.md#spec-and-statusroot@k8s-master01:~# kubectl explain Job
FIELDS:
activeDeadlineSeconds <integer> #通过指定job 存活时间,来结束一个 job。当 job 运行时间达到 activeDeadlineSeconds 指定的时间后,job 会停止由它启动的所有任务(如:pod),并设置 job 的状态为 failed
backoffLimit <integer> #job 建议指定 pod 的重启策略为 never,如:.spec.template.spec.restartPolicy = "Never",然后通过 job 的 backoffLimit 来指定失败重试次数,在达到 backoffLimit 指定的次数后,
job 状态设置为 failed(默认为 6 次)
completionMode <string>
completions <integer> #指定job 启动的任务(如:pod)成功运行 completions 次,job 才算成功结束
manualSelector <boolean>
parallelism <integer> #指定job 同时运行的任务(如:pod)个数,Parallelism 默认为 1, 如果设置为 0,则 job 会暂定
podFailurePolicy <Object>
selector <Object>
suspend <boolean>
template <Object> -required-
ttlSecondsAfterFinished <integer> #默认情况下,job 异常或者成功结束后,包括 job 启动的任务(pod),都不会被清理掉,因为你可以依据保存的 job 和 pod,查看状态、日志,以及调试等。这些用户可以手动删除,
用户手动删除 job,job controller 会级联删除对应的 pod,除了手动删除,通过指定参数 ttlSecondsAfterFinished 也可以实现自动删除 job,以及级联的资源,如:pod。如果设置为 0,job 会被立即删除。如果不指定,job 则不会被删除root@k8s-master01:~/hhh# cat job.yaml
apiVersion: batch/v1
kind: Job
metadata:
name: my-busybox-job
spec:
completions: 6 # job 结束需要成功运行的 Pod 个数,即状态为 Completed 的 pod 数
parallelism: 3 # 一次运行3个pod,这个值不会超过Completed个数
backoffLimit: 6 # 如果job失败,重试次数
template:
metadata:
labels:
app: test
spec:
restartPolicy: Never
containers:
- name: my-container-job
image: busybox
imagePullPolicy: IfNotPresent
command: ['sh', '-c']
args: ['echo "Welcome to xc";sleep 60; echo "Next to Meet you"']
1.root@k8s-master01:~/hhh# kubectl get pod
NAME READY STATUS RESTARTS AGE
my-busybox-job-6pcsb 1/1 Running 0 3s
my-busybox-job-jmz76 1/1 Running 0 4s
my-busybox-job-ktpsd 1/1 Running 0 3s
root@k8s-master01:~/hhh# kubectl logs my-busybox-job-6pcsb
Welcome to xc
2.root@k8s-master01:~/hhh# kubectl logs my-busybox-job-6pcsb
Welcome to xc
Next to Meet you
root@k8s-master01:~/hhh# kubectl get pod
NAME READY STATUS RESTARTS AGE
my-busybox-job-4sbm6 0/1 ContainerCreating 0 2s
my-busybox-job-6pcsb 0/1 Completed 0 66s
my-busybox-job-jmz76 0/1 Completed 0 67s
my-busybox-job-ktpsd 0/1 Completed 0 66s
my-busybox-job-rgcxw 0/1 ContainerCreating 0 2s
my-busybox-job-xqnjq 0/1 ContainerCreating 0 2s
3.root@k8s-master01:~/hhh# kubectl get pod
NAME READY STATUS RESTARTS AGE
my-busybox-job-4sbm6 1/1 Running 0 10s
my-busybox-job-6pcsb 0/1 Completed 0 74s
my-busybox-job-jmz76 0/1 Completed 0 75s
my-busybox-job-ktpsd 0/1 Completed 0 74s
my-busybox-job-rgcxw 1/1 Running 0 10s
my-busybox-job-xqnjq 1/1 Running 0 10s
root@k8s-master01:~/hhh# kubectl logs my-busybox-job-6pcsb
Welcome to xc
Next to Meet you
root@k8s-master01:~/hhh# kubectl get pod
NAME READY STATUS RESTARTS AGE
my-busybox-job-4sbm6 0/1 Completed 0 68s
my-busybox-job-6pcsb 0/1 Completed 0 2m12s
my-busybox-job-jmz76 0/1 Completed 0 2m13s
my-busybox-job-ktpsd 0/1 Completed 0 2m12s
my-busybox-job-rgcxw 0/1 Completed 0 68s
my-busybox-job-xqnjq 0/1 Completed 0 68sroot@k8s-master01:~/hhh# cat job.yaml
apiVersion: batch/v1
kind: Job
metadata:
labels:
job-name: echo
name: echo
namespace: default
spec:
# suspend: true # 1.21+
ttlSecondsAfterFinished: 100 #ttlSecondsAfterFinished字段的值为100,这意味着在Job完成后,它将在100秒后被自动删除。
backoffLimit: 4
completions: 1
parallelism: 1
template:
spec:
containers:
- command:
- echo
- Hello, Job
image: registry.cn-beijing.aliyuncs.com/dotbalo/busybox
imagePullPolicy: Always
name: echo
resources: {}
restartPolicy: Neverroot@k8s-master01:~/hhh# kubectl get pod
NAME READY STATUS RESTARTS AGE
echo-br67r 0/1 Completed 0 20s
root@k8s-master01:~/hhh# kubectl logs echo-br67r
Hello, JobCronJob 跟 Job 完成的工作是一样的,只不过 CronJob 添加了定时任务能力可以指定时间,实现周期性运行。Job,CronJob 和 Deployment,DaemonSet 显著区别在于不需要持续在后台运行
Deployment 主要用于管理无状态的应用(kubernetes 集群有一些 pod,某一个 pod 出现故障, 删除之后会重新启动一个 pod,那么 kubernetes 这个集群中 pod 数量就正常了,更多关注的是群体, 这就是无状态应用)。
使用场景:
1、在给定时间点只运行一次。
2、在给定时间点周期性地运行。
CronJob 的典型用法如下:
1、在给定的时间点调度 Job 运行。
2、创建周期性运行的 Job,例如数据库备份、发送邮件Linux 下的 crontab 和 Kubernetes 下的 CronJob 都是用于执行周期性任务的工具,但它们在实现方式和使用方式上有以下几点不同:
调度精度:Linux 下的 crontab 支持分钟级别的调度,而 Kubernetes 下的 CronJob 可以支持到秒级别的调度。
状态管理:Linux 下的 crontab 只能通过查看日志等方式来了解任务的运行情况,而 Kubernetes 下的 CronJob 可以通过 kubectl 工具查看任务的运行状态,并且可以对任务进行修改和删除等操作。
并发控制:Linux 下的 crontab 没有内置的并发控制机制,如果同一个任务同时被多次触发,可能会导致资源抢占。而 Kubernetes 下的 CronJob 可以通过 .spec.concurrencyPolicy 字段指定任务的并发策略,从而避免资源抢占的问题。
环境隔离:Linux 下的 crontab 所有任务都运行在同一个环境中,容易出现依赖冲突等问题。而 Kubernetes 下的 CronJob 可以定义多个 Pod 来运行不同的任务,从而实现了任务之间的环境隔离。
缩放性:Linux 下的 crontab 通常只能运行在单台服务器上,无法进行水平扩展。而 Kubernetes 下的 CronJob 可以运行在多节点的集群上,并且可以通过水平扩展来提高任务的并发度和可用性。
综上所述,Linux 下的 crontab 和 Kubernetes 下的 CronJob 在功能和使用方式上都有不同,具体使用哪种工具取决于具体的需求和场景。CronJob表达式由五个字段组成,分别代表分钟、小时、日、月、周几。每个字段可以是以下任何值:
单个数字:例如5表示第5分钟或5月份。
逗号分隔的数字列表:例如5,15,25表示第5、15和25分钟。
连续的数字范围:例如10-15表示从第10分钟到第15分钟。
星号(*):表示匹配该字段的所有值。例如在分钟字段上使用星号表示每分钟执行任务。
斜杠(/):表示步长值。例如在分钟字段上使用"*/3"表示每隔3分钟执行一次任务。
CronJob表达式示例:
每小时执行:0 * * * *
每天晚上10点执行:0 22 * * *
每周一早上6点执行:0 6 * * 1
每2分钟运行一次任务 : */2 * * * *kubectl create cronjob my-cronjob --image=busybox --schedule="*/1 * * * *" --dry-run=client -o yaml -- sh -c "date;sleep 10" > cronjob.yamlcat cronjob.yaml
apiVersion: batch/v1
kind: CronJob
metadata:
creationTimestamp: null
name: my-cronjob
spec:
jobTemplate:
metadata:
creationTimestamp: null
name: my-cronjob
spec:
template:
metadata:
creationTimestamp: null
spec:
#当需要关闭容器时,立即杀死容器而不等待默认的30秒优雅停机时长。
terminationGracePeriodSeconds: 0
containers:
- command:
- sh
- -c
- date;sleep 10
image: busybox
#imagePullPolicy: IfNotPresent:表示如果本地已经存在该镜像,则不重新下载;否则从远程 Docker Hub 下载该镜像
imagePullPolicy: IfNotPresent
name: my-cronjob
resources: {}
#restartPolicy: OnFailure:在容器执行失败时重新启动容器。
restartPolicy: OnFailure
#表示每分钟执行一次作业。
schedule: '*/1 * * * *'
status: {}root@k8s-master01:~/hhh# kubectl get pod
No resources found in default namespace.
root@k8s-master01:~/hhh# kubectl get cj
NAME SCHEDULE SUSPEND ACTIVE LAST SCHEDULE AGE
my-cronjob */1 * * * * False 1 2s 8swatch -n .5 'kubectl get pod'
root@k8s-master01:~/hhh# kubectl get pod
NAME READY STATUS RESTARTS AGE
my-cronjob-28363043-5g8xp 0/1 Completed 0 3m1s
my-cronjob-28363044-c9952 0/1 Completed 0 2m1s
my-cronjob-28363045-zrmn9 0/1 Completed 0 61s
my-cronjob-28363046-2zpqb 0/1 ContainerCreating 0 1s
root@k8s-master01:~/hhh# kubectl get pod
NAME READY STATUS RESTARTS AGE
my-cronjob-28363043-5g8xp 0/1 Completed 0 3m2s
my-cronjob-28363044-c9952 0/1 Completed 0 2m2s
my-cronjob-28363045-zrmn9 0/1 Completed 0 62s
my-cronjob-28363046-2zpqb 1/1 Running 0 2s
root@k8s-master01:~/hhh# kubectl get pod
NAME READY STATUS RESTARTS AGE
my-cronjob-28363043-5g8xp 0/1 Completed 0 3m12s
my-cronjob-28363044-c9952 0/1 Completed 0 2m12s
my-cronjob-28363045-zrmn9 0/1 Completed 0 72s
my-cronjob-28363046-2zpqb 0/1 Completed 0 12sroot@k8s-master01:~/hhh# cat cronjob.yaml
apiVersion: batch/v1
kind: CronJob
metadata:
creationTimestamp: null
name: my-cronjob
spec:
jobTemplate:
metadata:
creationTimestamp: null
name: my-cronjob
spec:
#activeDeadlineSeconds: 5:设置了 Pod 最大运行时间为 5 秒,如果超过这个时间就会被 Kubernetes 强制删除。
activeDeadlineSeconds: 5
template:
metadata:
creationTimestamp: null
spec:
#当需要关闭容器时,立即杀死容器而不等待默认的30秒优雅停机时长。
terminationGracePeriodSeconds: 0
containers:
- command:
- sh
- -c
- date;sleep 10
image: busybox
imagePullPolicy: IfNotPresent
name: my-cronjob
resources: {}
#restartPolicy: OnFailure:在容器执行失败时重新启动容器。
restartPolicy: OnFailure
#表示每分钟执行一次作业。
schedule: '*/1 * * * *'
status: {}root@k8s-master01:~/hhh# kubectl get cj
NAME SCHEDULE SUSPEND ACTIVE LAST SCHEDULE AGE
my-cronjob */1 * * * * False 0 6s 27s
root@k8s-master01:~/hhh# kubectl get pod
No resources found in default namespace.root@k8s-master01:~/hhh# kubectl get pod
NAME READY STATUS RESTARTS AGE
my-cronjob-28363091-rsb9s 0/1 ContainerCreating 0 1s
root@k8s-master01:~/hhh# kubectl get pod
NAME READY STATUS RESTARTS AGE
my-cronjob-28363091-rsb9s 1/1 Running 0 5s
root@k8s-master01:~/hhh# kubectl get pod
No resources found in default namespace.
root@k8s-master01:~/hhh# kubectl get cronjob -w
NAME SCHEDULE SUSPEND ACTIVE LAST SCHEDULE AGE
my-cronjob */1 * * * * False 0 24s 6m45s
my-cronjob */1 * * * * False 1 0s 7m21s
my-cronjob */1 * * * * False 0 6s 7m27s
my-cronjob */1 * * * * False 1 0s 8m21s
my-cronjob */1 * * * * False 0 6s 8m27sroot@k8s-master01:~/hhh# cat cronjob.yaml
apiVersion: batch/v1
kind: CronJob
metadata:
labels:
run: hello
name: hello
namespace: default
spec:
concurrencyPolicy: Allow
failedJobsHistoryLimit: 1
jobTemplate:
metadata:
spec:
template:
metadata:
labels:
run: hello
spec:
containers:
- args:
- /bin/sh
- -c
- date; echo Hello from the Kubernetes cluster
image: registry.cn-beijing.aliyuncs.com/dotbalo/busybox
imagePullPolicy: Always
name: hello
resources: {}
restartPolicy: OnFailure
securityContext: {}
schedule: '*/1 * * * *'
successfulJobsHistoryLimit: 3
suspend: falseapiVersion: v1
kind: Pod
metadata:
name: "pod7"
namespace: default
labels:
app: "pod7"
spec:
initContainers:
- name: init-git
image: "nginx:1.24.0"
#更新软件包以及下载git并clone代码
command: ["/bin/sh"]
args: ["-c", "apt-get update; apt-get install git -y; git clone https://github.com/fandaoshuai777/k8s-init-container.git /opt"]
volumeMounts:
- name: workdir
mountPath: /opt
containers:
- name: pod7
image: "nginx:latest"
volumeMounts:
- name: workdir
mountPath: /usr/share/nginx/html
volumes:
- name: workdir
emptyDir: {}root@k8s-master01:~/hhh# kubectl get pod -w
NAME READY STATUS RESTARTS AGE
pod7 0/1 Init:0/1 0 7s
pod7 0/1 PodInitializing 0 64s
pod7 1/1 Running 0 80s
可以看到是先运行的初始化容器Initroot@k8s-master01:~/hhh# kubectl logs -f pod/pod7 -c init-git
Get:1 http://deb.debian.org/debian bullseye InRelease [116 kB]
Get:2 http://deb.debian.org/debian-security bullseye-security InRelease [48.4 kB]
Get:3 http://deb.debian.org/debian bullseye-updates InRelease [44.1 kB]
Get:4 http://deb.debian.org/debian bullseye/main amd64 Packages [8062 kB]
Get:5 http://deb.debian.org/debian-security bullseye-security/main amd64 Packages [260 kB]
Get:6 http://deb.debian.org/debian bullseye-updates/main amd64 Packages [17.7 kB]
Fetched 8548 kB in 13s (643 kB/s)
Reading package
root@k8s-master01:~/hhh# kubectl get pod -owide
NAME   READY   STATUS    RESTARTS   AGE     IP               NODE      NOMINATED NODE   READINESS GATES
pod7   1/1     Running   0          5m17s   10.200.135.190   node-03   <none>           <none>
root@k8s-master01:~/hhh# curl 10.200.135.190/dist/index.html
<!DOCTYPE html><html lang="en"><head><meta charset="UTF-8"><meta http-equiv="X-UA-Compatible" content="IE=edge"><meta name="viewport" content="width=device-width,initial-scale=1"><meta name="keywords"><meta name="description"><link rel="icon" href="favicon.ico"><title>小鹰加油商家端</title><link href="css/chunk-vendors.1646735898931.css" rel="stylesheet"><link href="css/app.1646735898931.css" rel="stylesheet"></head><body><div id="app"></div><script>// var _hmt = _hmt || [];
                        // (function() {
                        //      var hm = document.createElement('script');
                        //      hm.src = 'https://hm.baidu.com/hm.js?9d1e524198ede8205ac7c938c243344c';
                        //      var s = document.getElementsByTagName('script')[0];
                        //      s.parentNode.insertBefore(hm, s);
                        // })();</script><script src="js/chunk-vendors.1646735898931.js"></script><script src="js/app.1646735898931.js"></script></body></html>
apiVersion: v1
kind: Pod
metadata:
name: init-demo
spec:
containers:
- name: nginx
image: nginx
ports:
- containerPort: 80
volumeMounts:
- name: workdir
mountPath: /usr/share/nginx/html
# 这些容器在 Pod 初始化期间运行
initContainers:
- name: install
image: busybox:1.28
command:
- wget
- "-O"
- "/work-dir/index.html"
- http://info.cern.ch
volumeMounts:
- name: workdir
mountPath: "/work-dir"
dnsPolicy: Default
volumes:
- name: workdir
emptyDir: {}root@k8s-master01:~/hhh# kubectl create -f init.yaml
pod/init-demo created
root@k8s-master01:~/hhh# kubectl get pod -w
NAME READY STATUS RESTARTS AGE
init-demo 0/1 Init:0/1 0 7s
init-demo 0/1 Init:0/1 0 21s
init-demo 0/1 PodInitializing 0 22s
init-demo 1/1 Running 0 38s
root@k8s-master01:~/hhh# kubectl get pod -owide
NAME READY STATUS RESTARTS AGE IP NODE NOMINATED NODE READINESS GATES
init-demo 1/1 Running 0 119s 10.200.135.189 node-03 <none> <none>
root@k8s-master01:~/hhh#
root@k8s-master01:~/hhh# curl 10.200.135.189
<html><head></head><body><header>
<title>http://info.cern.ch</title>
</header>
<h1>http://info.cern.ch - home of the first website</h1>
<p>From here you can:</p>
<ul>
<li><a href="http://info.cern.ch/hypertext/WWW/TheProject.html">Browse the first website</a></li>
<li><a href="http://line-mode.cern.ch/www/hypertext/WWW/TheProject.html">Browse the first website using the line-mode browser simulator</a></li>
<li><a href="http://home.web.cern.ch/topics/birth-web">Learn about the birth of the web</a></li>
<li><a href="http://home.web.cern.ch/about">Learn about CERN, the physics laboratory where the web was born</a></li>
</ul>
</body></html>apiVersion: apps/v1
kind: Deployment
metadata:
labels:
app: test-init
name: test-init
namespace: kube-public
spec:
replicas: 1
selector:
matchLabels:
app: test-init
template:
metadata:
labels:
app: test-init
spec:
volumes:
- name: data
emptyDir: {}
initContainers:
- name: init-touch
image: nginx
imagePullPolicy: IfNotPresent
command: ["sh", "-c", "touch /mnt/test-init.txt"]
volumeMounts:
- name: data
mountPath: /mnt
containers:
- name: test-init
image: nginx
imagePullPolicy: IfNotPresent
volumeMounts:
- name: data
mountPath: /mnt# vim /etc/kubernetes/manifests/kube-apiserver.yaml
apiVersion: v1
kind: Pod
metadata:
annotations:
kubeadm.kubernetes.io/kube-apiserver.advertise-address.endpoint: 192.168.100.32:6443
creationTimestamp: null
labels:
component: kube-apiserver
tier: control-plane
name: kube-apiserver
namespace: kube-system
spec:
containers:
- command:
- kube-apiserver
- --advertise-address=192.168.100.32
- --allow-privileged=true
- --authorization-mode=Node,RBAC
- --client-ca-file=/etc/kubernetes/pki/ca.crt
- --enable-admission-plugins=NodeRestriction
- --enable-bootstrap-token-auth=true
- --etcd-cafile=/etc/kubernetes/pki/etcd/ca.crt
# vim /etc/kubernetes/manifests/kube-controller-manager.yaml

apiVersion: v1
kind: Pod
metadata:
  creationTimestamp: null
  labels:
    component: kube-controller-manager
    tier: control-plane
  name: kube-controller-manager
  namespace: kube-system
spec:
  containers:
  - command:
    - kube-controller-manager
    - --allocate-node-cidrs=true
    - --authentication-kubeconfig=/etc/kubernetes/controller-manager.conf
    - --authorization-kubeconfig=/etc/kubernetes/controller-manager.conf
    - --bind-address=127.0.0.1
    - --client-ca-file=/etc/kubernetes/pki/ca.crt
    - --cluster-cidr=172.16.0.0/12
    - --cluster-name=kubernetes
    - --cluster-signing-cert-file=/etc/kubernetes/pki/ca.crt
# vim /etc/kubernetes/manifests/kube-scheduler.yaml
apiVersion: v1
kind: Pod
metadata:
  creationTimestamp: null
  labels:
    component: kube-scheduler
    tier: control-plane
  name: kube-scheduler
  namespace: kube-system
spec:
  containers:
  - command:
    - kube-scheduler
    - --authentication-kubeconfig=/etc/kubernetes/scheduler.conf
    - --authorization-kubeconfig=/etc/kubernetes/scheduler.conf
    - --bind-address=127.0.0.1
    - --kubeconfig=/etc/kubernetes/scheduler.conf
    - --leader-elect=true
    - --feature-gates=EphemeralContainers=true #添加此项即可,其他不动
    image: registry.cn-hangzhou.aliyuncs.com/google_containers/kube-scheduler:v1.23.14
    imagePullPolicy: IfNotPresent
    livenessProbe:
      failureThreshold: 8
      httpGet:
        host: 127.0.0.1
        path: /healthz
        port: 10259
        scheme: HTTPS
      initialDelaySeconds: 10
      periodSeconds: 10
      timeoutSeconds: 15
    name: kube-scheduler
    resources:
      requests:
        cpu: 100m
    startupProbe:
      failureThreshold: 24
      httpGet:
        host: 127.0.0.1
        path: /healthz
        port: 10259
        scheme: HTTPS
      initialDelaySeconds: 10
      periodSeconds: 10
      timeoutSeconds: 15
    volumeMounts:
    - mountPath: /etc/kubernetes/scheduler.conf
      name: kubeconfig
      readOnly: true
  hostNetwork: true
  priorityClassName: system-node-critical
  securityContext:
    seccompProfile:
      type: RuntimeDefault
  volumes:
  - hostPath:
      path: /etc/kubernetes/scheduler.conf
      type: FileOrCreate
    name: kubeconfig
status: {}
[root@k8s-master01 ~]# kubectl get node
NAME STATUS ROLES AGE VERSION
k8s-master01 Ready control-plane,master 6d1h v1.23.14
k8s-master02 Ready control-plane,master 6d1h v1.23.14
k8s-master03 Ready control-plane,master 6d1h v1.23.14
k8s-node01 Ready <none> 6d1h v1.23.14
k8s-node02 Ready <none> 6d1h v1.23.14[root@k8s-master01 ~]# kubectl get po -n kube-system
NAME READY STATUS RESTARTS AGE
...
...
...
metrics-server-5cf8885b66-99jwg 1/1 Running 1 (29h ago) 6d[root@k8s-master01 ~]# kubectl debug metrics-server-5cf8885b66-99jwg -ti --image=registry.cn-beijing.aliyuncs.com/dotbalo/debug-tools -n kube-system
(07:19 metrics-server-5cf8885b66-99jwg:/) netstat -lntp
Active Internet connections (only servers)
Proto Recv-Q Send-Q Local Address Foreign Address State PID/Program name
tcp6 0 0 :::4443 :::* LISTEN -[root@k8s-master01 ~]# kubectl describe po metrics-server-5cf8885b66-99jwg -n kube-system
tbalo/debug-tools"
Warning Failed 2m32s kubelet Error: ImagePullBackOff
Normal Pulling 2m17s (x3 over 3m28s) kubelet Pulling image "registry.cn-beijing.aliyuncs.com/dotbalo/debug-tools"
Normal Pulled 17s kubelet Successfully pulled image "registry.cn-beijing.aliyuncs.com/dotbalo/debug-tools" in 2m0.031448466s
Normal Created 17s kubelet Created container debugger-z8sj5
Normal Started 17s kubelet Started container debugger-z8sj5
[root@k8s-master01 ~]# kubectl exec metrics-server-5cf8885b66-99jwg -ti -c debugger-z8sj5 -n kube-system -- bash$ vim /etc/kubernetes/kubelet-conf.yml
...
...
...
featureGates:
EphemeralContainers: true[root@k8s-master01 ~]# kubectl get po -n kube-system
NAME READY STATUS RESTARTS AGE
...
...
...
metrics-server-5cf8885b66-99jwg 1/1 Running 1 (29h ago) 6d[root@k8s-master01 ~]# kubectl debug metrics-server-5cf8885b66-99jwg -ti --image=registry.cn-beijing.aliyuncs.com/dotbalo/debug-tools -n kube-system
(07:19 metrics-server-5cf8885b66-99jwg:/) netstat -lntp
Active Internet connections (only servers)
Proto Recv-Q Send-Q Local Address Foreign Address State PID/Program name
tcp6 0 0 :::4443 :::* LISTEN -[root@k8s-master01 ~]# kubectl describe po metrics-server-5cf8885b66-99jwg -n kube-system
tbalo/debug-tools"
Warning Failed 2m32s kubelet Error: ImagePullBackOff
Normal Pulling 2m17s (x3 over 3m28s) kubelet Pulling image "registry.cn-beijing.aliyuncs.com/dotbalo/debug-tools"
Normal Pulled 17s kubelet Successfully pulled image "registry.cn-beijing.aliyuncs.com/dotbalo/debug-tools" in 2m0.031448466s
Normal Created 17s kubelet Created container debugger-z8sj5
Normal Started 17s kubelet Started container debugger-z8sj5
[root@k8s-master01 ~]# kubectl exec metrics-server-5cf8885b66-99jwg -ti -c debugger-z8sj5 -n kube-system -- bash[root@k8s-master01 ]# kubectl get po -n kube-system -l k8s-app=metrics-server
NAME READY STATUS RESTARTS AGE
metrics-server-89786cd84-t9dwm 1/1 Running 4 (5d3h ago) 97d{
"apiVersion":"v1"
"kind":"EphemeralContainers",
metadata":{
"name":"metrics-server-89786cd84-t9dwm"
},
"ephemeralContainers": [{
"command":[
"sh"
]
"image":"busybox",
"imagePullPolicy":"IfNotPresent",
"name":"debugger",
"stdin": truer,
"tty": true,
"terminationMessagePolicy":"File"
}]
}"kind":"EphemeralContainers"
apiversion":"v1"
metadata":!
"name":"metrics-server-89786cd84-t9dwm""namespace":"kube-system"
ephemeralContainers":[
"name":"debugger""image":"busybox"
"command":[
"sh"root@k8s-master01:/usr/local/bin# kubectl exec -it ephemeral-demo -- sh
error: Internal error occurred: error executing command in container: failed to exec in container: failed to start exec "32df24029e88b24ebb8a6b12ca26b70860ec6d9ca401e9d246303bacd40ff7b6": OCI runtime exec failed: exec failed: unable to start container process: exec: "sh": executable file not found in $PATH: unknownroot@k8s-master01:/usr/local/bin# kubectl debug -it ephemeral-demo --image=busybox:1.28 --target=ephemeral-demo
Targeting container "ephemeral-demo". If you don't see processes from this container it may be because the container runtime doesn't support this feature.
Defaulting debug container name to debugger-mzvld.
If you don't see a command prompt, try pressing enter.
/ # root@deploy:~# kubectl describe pod ephemeral-demo
Name: ephemeral-demo
Namespace: default
Priority: 0
Service Account: default
Node: node-02/192.168.20.239
Start Time: Fri, 08 Dec 2023 11:18:02 +0800
Labels: run=ephemeral-demo
Annotations: <none>
Status: Running
IP: 10.200.58.216
IPs:
IP: 10.200.58.216
Containers:
ephemeral-demo:
Container ID: containerd://405f5459f20a98b7ca2c8342c38aa567d09e255b9d7ad16e9f04ab7460c1dbd7
Image: harbor.nbbnai.com/easzlab/pause:3.9
Image ID: harbor.nbbnai.com/easzlab/pause@sha256:3ec9d4ec5512356b5e77b13fddac2e9016e7aba17dd295ae23c94b2b901813de